Using the Steinberg CC121
Steinberg CC121 is a compact control surface originally designed for use with the Cubase™ digital audio workstation.

Connecting the CC121
Plug the USB cable from the CC121 into a USB2 or USB3 port on your computer. The device will be automatically recognized by your operating system and will appear in any of the lists of possible MIDI ports in Ardour.
To connect the CC121 to Ardour, open the Preferences dialog, and then click Control Surfaces. Tick the Enable checkbox opposite to "Steinberg CC121" to activate Ardour's CC121 support.
Once the device is activated, click Show Protocol Settings and in the newly opened window select the device in the drop-down lists for incoming and outgoing MIDI events.
Once you select the input and output port, the CC121 will be ready to use. You only need do this once: once these ports are connected and your session has been saved, the connections will be made automatically in this and other future sessions.
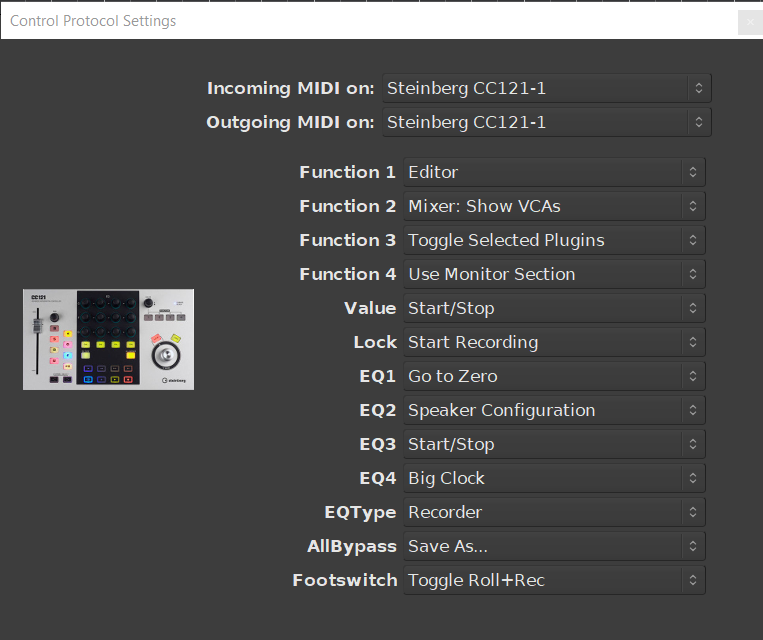
CC121 Configuration
Ardour supports a subset of features available in the CC121. Various actions in the program can be mapped to the following buttons and encoders on the device:
- Function 1 through Function 4 buttons
- Value encoder
- Lock button
- EQ type button
- All Bypass button
- EQ1 through EQ4 toggles
Here is an example of a customized setup:
Some additional behavior cannot be configured:
| Fader | Controls the fader of the selected track or bus |
|---|---|
| Pan encoder | Controls the panner of the selected track or bus |
| M button | Mutes the selected track or bus |
| S button | Soloes the selected track or bus |
| R button | Read automation, sets the fader to the play mode, can only be disabled by pressing E, Edit instrument or Write automation |
| W button | Write automation, sets the fader to the write mode, can only be disabled by pressing E, Edit instrument or Read automation |
| Speaker button | Alternate between In, Disk, In/Disk, and In and Disk both disabled |
| O button | Arms a track for recording |
| E (edit) button | Sets the fader to touch mode, can only be disabled by pressing Edit instrument, Read automation, or Write automation |
| Edit instrument button | Sets the fader to the manual mode, can only be disabled by pressing E, Read automation or Write automation |
| Channel Select | Left-pointing button selects the previous track, right-pointing button selects the next track |
| Jog Wheel | Jogs through audio with Jog button enabled, zooms in/out with Jog button disabled |
| Previous button | Moves the playhead to the previous marker |
| Rewind | Moves the playhead back in time |
| Forward | Moves the playhead forward in time |
| Next button | Moves the playhead to the next marker |
| Loop/Cycle button | Enables/disables region looping |
| Stop | Stops the transport |
| Play | Rolls the transport |
| Record |
Starts to blink when pressed, when a track has record enable set and play is pressed, recording to the track will start and it will be lit during recording. When pressed again during recording, track will keep playing but is no longer recording and the button will no longer be lit. When a track does not have record enable set, the record button will keep blinking when play is pressed, the track will play but not record. Once the record enable button is pressed, recording has started and the button will be lit. |