Selection and Punch Clocks
The Selection Clocks
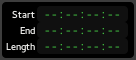
The current selection range, as set with the Range Mode tool, is displayed in these three clocks: start of the range, end of the range, and length.
Clicking on the range clocks will locate to either the beginning or end of the punch range.
Right clicking on any of the clocks brings up a context menu allowing to change the type of time display between the 4 clock modes, and to copy the selected clock's time to the clipboard.
The Punch Controls & clocks
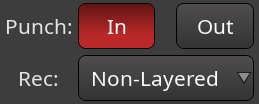
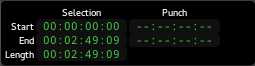
The punch controls available in the main toolbar, work in conjunction with the punch clocks, only visible while in Editor Mode.
The In and Out buttons relate to the Punch range, and allow to use only one of the two punch boundaries, or both:
| In only | Records from the In marker on, without an end boundary |
|---|---|
| Out only | Records until the Out marker, without a beginning boundary |
| In and Out | Records only between the In and Out markers |
The punch clocks can be controlled the same way as the range clocks (moving the playhead, and changing the display mode).
Recording mode
The Rec button affects how the tracks behave when recording:
| Non-Layered OFF (default) | Tracks in normal mode will record non-destructively — new data is written to new files, and when overdubbing, new regions will be layered on top of existing ones. This is the recommended mode for most workflows. |
|---|---|
| Non-Layered ON | Tracks using non-layered mode will record non-destructively — new data is written to new files, but when overdubbing, the existing regions are trimmed so that there are no overlaps. This does not affect the previously recorded audio data, and trimmed regions can be expanded again at will. Non-layered mode can be very useful for spoken word material, especially in combination with push/pull trimming. |
See Track Modes for more information.