Loudness Analyzer and Normalizer
The Loudness Analyzer and Normalizer tool is useful at the end of the mixing process to make the final audio file comply with different specs regarding loudness.
This is a rather advanced mode. When using the Loudness Analyzer &
Normalizer (or LAN), one has to make sure than normalization
is disabled when exporting.
In general, it is recommended to just use
automatic export normalization, in the Export
dialog. This can also produce results for multiple targets at the
same time.
It is enabled by checking Enable master-bus output gain control in the Preferences. The Master Bus strip then shows a LAN button to start the analysis, and a volume slider that is the global gain that can be set either manually or by the loudness normalizer.
The LAN can also be started from the Session > Loudness assistant… menu. If the option above is not enabled, Ardour will link to the relevant page of the Preferences.
Either method show the following window:
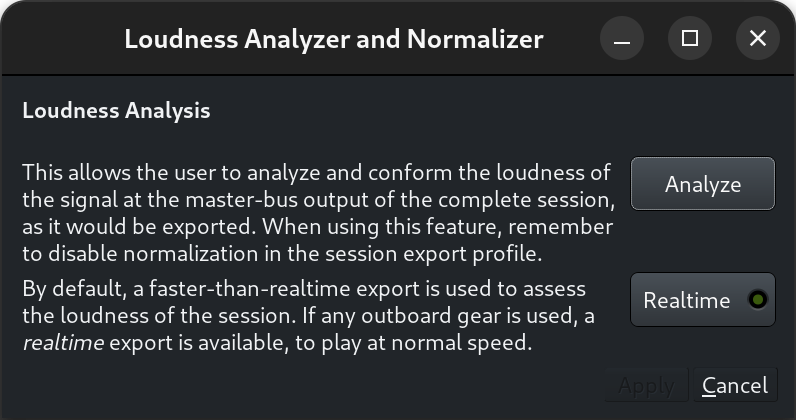
This window allows to start the loudness analysis. A choice is offered between freewheeling (i.e. Ardour renders the session as fast as possible to measure the loudness), by default, or Realtime, for cases where freewheeling would not accurately render the session, e.g. if a hardware or JACK effect is used in the session, by clicking on the Realtime toggle button.
After the analysis is over, the Loudness Analyzer and Normalizer is shown:
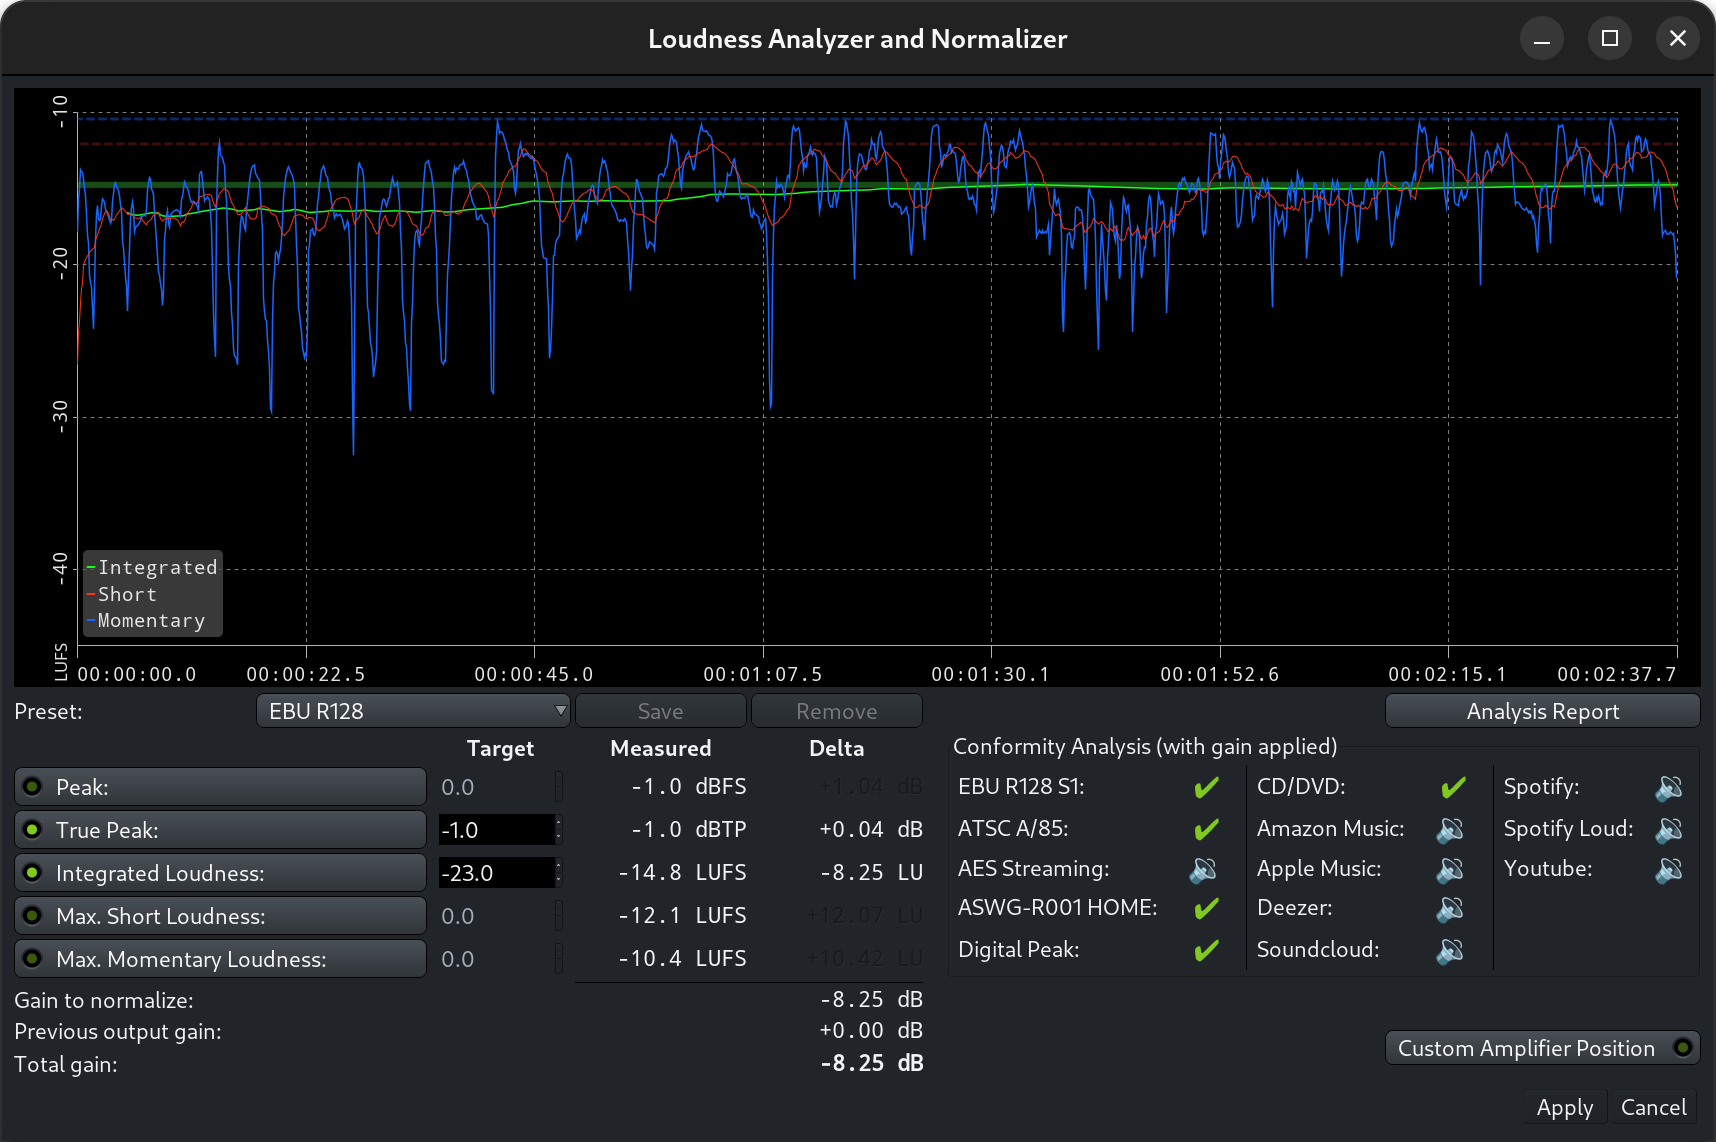
The Loudness Graph
At the top of the window, a loudness graph visually represents the analysis. The x-axis represents the time, and the y-axis represents the perceived loudness in LUFS:
- Integrated loudness averaging the loudness on the whole session
- Short loudness using a sliding time window of 3 seconds
- Momentary loudness using a sliding time window of 400 ms.
Normalization Parameters
As loudness is a perceived sonic energy, and depends on the level, frequency, duration and nature of the sound, this window allows to base the calculation of the loudness normalization on different parameters :
- Peak : is the highest signal level value
- True Peak : is the highest signal level value where the signal has been oversampled to figure out more in-between values between the samples (interpolation)
- Integrated Loudness : is the loudness computed from the whole session or range
- Max Short Loudness : is the maximum loudness computed on short time ranges (3 seconds)
- Max Momentary Loudness : is the maximum momentary loudness
Any combination of these parameters can be taken into account when determining the gain normalization, by checking its momentary button, and setting a Target value.
Ardour shows both the Measured value of the parameters, and the Delta value, i.e. the difference between the Target and Measured values, hence the gain correction.
The maximum Delta value is the Gain correction to apply to fit all the Target values.
Ardour shows, under the parameters, a summary of the calculation :
- Gain to normalize: is the max Delta value
- Previous output gain: is the current Master track gain
- Total Gain: is the difference between these two values, hence the correction to apply
Presets
A selection of presets is offered to simplify the normalization. These presets apply the relevant parameters and their target values. Below is a table of these presets:
| Parameter name: | dbFS | dBTP | LUFS | short | mom. | FS | TP | int | sht | mom | maxIntg | notes |
|---|---|---|---|---|---|---|---|---|---|---|---|---|
| EBU R128 | false | true | true | false | false | 0 | -1.0 | -23 | 0 | 0 | -22.5 | -23.5 |
| EBU R128 S1 | false | true | true | true | false | 0 | -1.0 | -23 | -18 | 0 | -22.5 | -23.5 |
| ATSC A/85 | false | true | true | true | false | 0 | -2.0 | -24 | 0 | 0 | -22.0 | -26.0 |
| AES Streaming | false | true | true | false | false | 0 | -1.0 | -18 | 0 | 0 | -16.0 | -20.0 |
| ASWG-R001 HOME | false | true | true | true | false | 0 | -1.0 | -24 | 0 | 0 | -22.0 | -26.0 |
| Digital Peak | true | false | false | false | false | 0 | 0.0 | 0 | 0 | 0 | 0.0 | -200.0 |
| CD/DVD | true | true | true | false | false | 0 | -0.1 | -9 | 0 | 0 | 0.0 | -200.0 |
| Amazon Music | false | true | true | false | false | 0 | -2.0 | -14 | 0 | 0 | -9.0 | -19.0 |
| Apple Music | false | true | true | false | false | 0 | -1.0 | -16 | 0 | 0 | -15.0 | -17.0 |
| Deezer | false | true | true | false | false | 0 | -1.0 | -15 | 0 | 0 | -14.0 | -16.0 |
| Soundcloud | false | true | true | false | false | 0 | -1.0 | -10 | 0 | 0 | -8.0 | -13.0 |
| Spotify | false | true | true | false | false | 0 | -1.0 | -14 | 0 | 0 | -8.0 | -20.0 |
| Spotify Loud | false | true | true | false | false | 0 | -2.0 | -11 | 0 | 0 | -5.0 | -17.0 |
| Youtube | false | true | true | false | false | 0 | -1.0 | -14 | 0 | 0 | -13.0 | -15.0 |
New presets can be created at will and saved/removed using the Save and Remove buttons next to the preset choice. The Standard presets listed above can not be removed or edited.
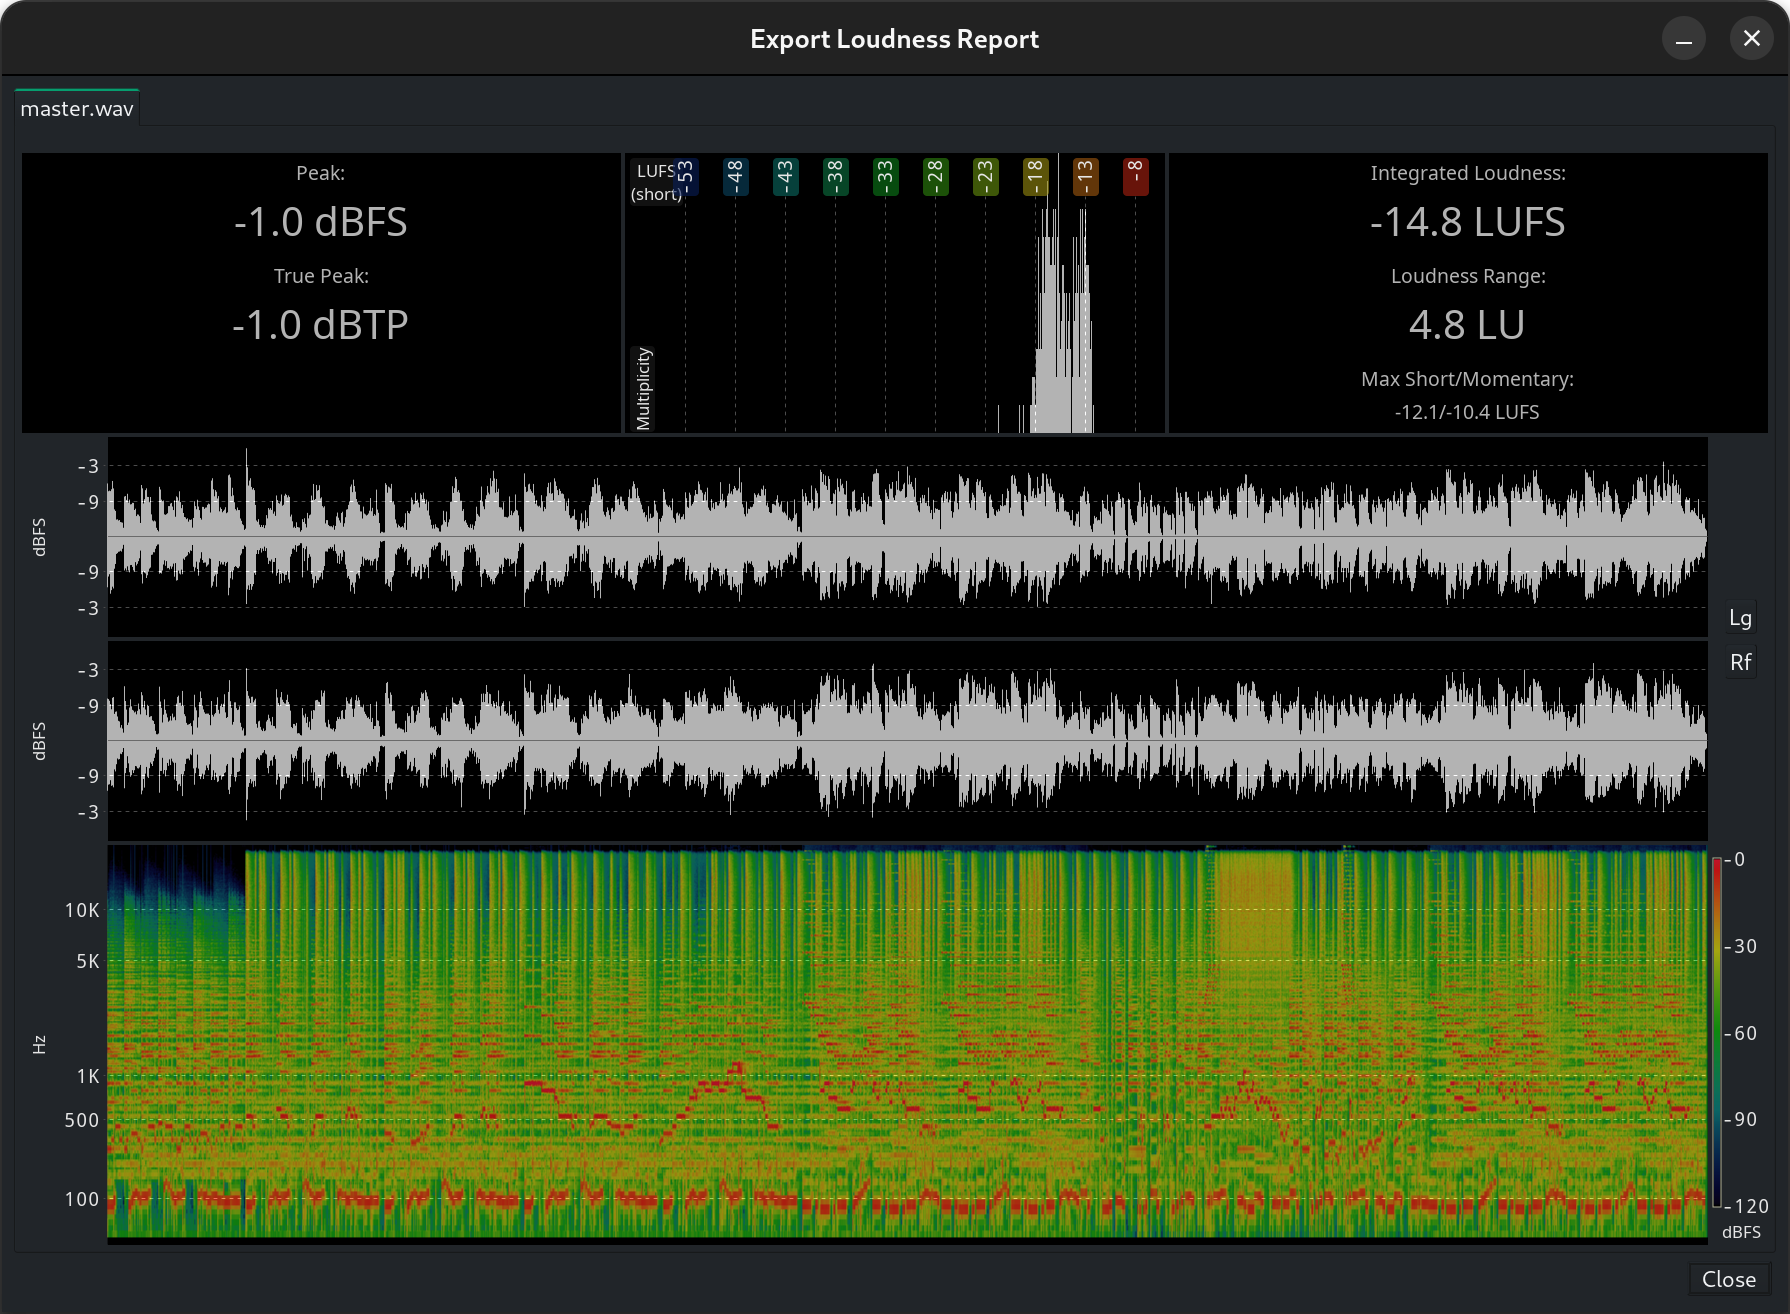
The Analysis Report button allows to visually represent the analysis with a graph in a very similar window to the one in the Post-Export analysis.
The Conformity Analysis Panel
At the lower right end of the window is a Conformity Analysis info panel indicating, for each of the presets above, if the corrected gain would fit the required values:
- ✖: the signal is too loud
- ✔: the signal is too quiet, but satisfies the max. loudness spec
- ✔: signal loudness is within the spec.
Lastly, the gain correction is, by default, applied after all the processors of the master bus. This can also be changed, either by checking the Custom Amplifier Position temporaty button in this window, or in the Master strip, by Right-clicking the gain slider and checking Custom LAN Amp Position. The gain normalizer then becomes a processor in the processors box of the Master strip, that can be moved as needed like any processor/effect.